For Comic con this sat 4th March. My two friends and myself decided to dress as characters from the Netflix show Once upon a time. I decided to dress as Snow I used this image as reference which can be found at: https://uk.pinterest.com/pin/125537908335626409/
I had a very short space of time to achieve this look. I put the costume together in two days. I feel there is alot more I could have done to make my costume better however, I am happy with my result. I started my raiding charity shops to see if i could find key items which I could alter.
My first item I purchased was a light brown leather jacket with sleeves and a white fur collar. The first adjustment was to cut the sleeves off the jacket. I found that the jacket was too short so I cut the sleeves open and attached them to the bottom of the jacket. In the image below you can see how I used pins to attach the material to the bottom. The length was alot better with the added material. I also used pins to tuck the extra material around the shoulder pads to make the new adjusted sleeves look neat.
As you can see in the image of Snow above, on her jacket she has panels of different materials. The image above shows some material that I had kept from my degree. I was used in my installation for the end of degree exhibition. I like the pattern on the material however my only issue was the colour. I wanted the material to blend with the colour of the jacket. I decided to experiment with the idea of dying the colour of the material. I had to be efficient and use what I had to hand. I took a bowl and filled it with coffee and water then left the material to soak. The image above shows the result. As you can see this has made a difference however not to the extent I needed.
 I decided to carry on experimenting with other substances. I tried using white face paint to make the material lighter. I also used watercolour to dye the material. My last idea was to use gravy browning. I diluted it slightly with water so that it wouldn’t be too sticky. I made the material patchy to look worn and old. I found that when I held it to the light the orange and red pigment was still showing through so I turned the material over and painted the entire piece with diluted gravy browning. I did loose alot of the orange pigment by doing this.
My next concern involved the fur. On Snow’s jacket the fur is tonal with different browns. Due to the short space of time I had to make the costume I could only find a jacket with white fur. I am also aware that the fur looks very artificial. I used a comb to try and make the fur look more natural. You can see the difference in the first image above. The second image shows a spare piece of fur that i unpicked from the bottom of the original sleeve.
I decided to apply my experience from Macbeth and use the same method to colour the fur as I did with the old man wig. I used a comb and I experimented again with coffee and gravy browning. I used a paint brush to apply coffee to a comb which I then brushed through the fur. This method works really well as you are left with a natural look. The colour does not look blotchy. The coffee worked really well and I was really happy with the resulting colour. I found that the gravy browning did not work as well. Even when diluted the gravy browning was making the fur clump together and look patchy. I found that I was achieving the same richness in colour by using different qualities of coffee to water. The less water I added the darker brown I was achieving. This was brilliant as it then becomes much easier to achieve natural tones in the fur.
I wanted to decide whether i should or not dye the fur on the jacket. I used the spare piece of fur that I dyed with coffee to see how the jacket could look with the cream fur or the dyed fur. Unfortunately I didn’t have time to dye the fur. If I had the time I would have definitely dyed the fur. I may continue with the project even though comic con has passed.

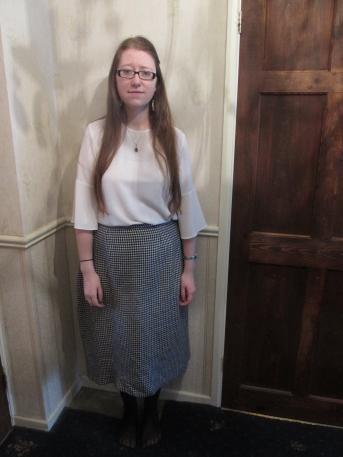


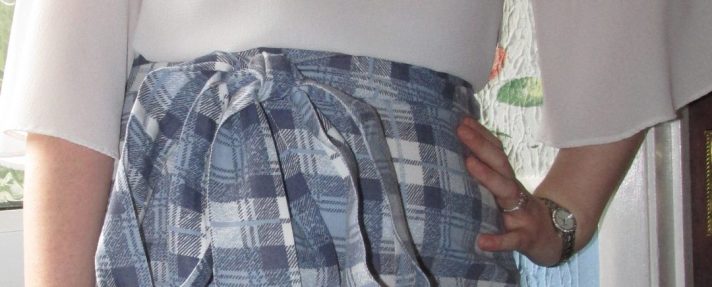 This is a skirt that I designed and made. I found the fabric in a charity shop. It was originally a duvet cover. I find this a brilliant way to buy fabric as you end up with alot of fabric for your money which is great. I made my own pattern for this skirt. The biggest challenge I had to overcome was creating the belt to make the bow. As the fabric was a slightly lighter colour on the inside I had to sew the fabric inside out to create a tube then pull the fabric out the right way. It was rather time consuming. I also created a blind hem to create a professional edge to the skirt. I’m really happy with the finished piece and I wear it all the time.